I published my How-To Hair Tutorial almost three years ago to the date, and it still remains one of my most popular. It’s also one of my most-asked questions on social media, which baffles me since most of the time my hair is a hot-mess…like literally, I’m almost always in need of a hair brush.
But my hair is a little longer now, and I discovered some new products, so I thought I’d share an updated tutorial on how I create loose, beachy waves. I’m also back to using a traditional curling iron (as opposed to a wand), so it may be helpful to see this method.
As for my haircut, I have a long angled bob (I believe kids these days refer to it as a lob), with long layers throughout. I have a wicked cowlick, so I’m forever a side-swooped bang girl. My hair is shoulder-length, but this method works the same with longer or shorter hair.

{The Tools}
Hair Dryer // Dries your hair in half the time, while smoothing the cuticle. It’s quiet, too!
1.25-inch barrel Curling Iron // I’m not picky on the brand, but I hear great things about this one
Brush // Great for detangling…I have the small one because it’s great for travel
Clips // Holds hair in sections while drying & curling

{The Products}
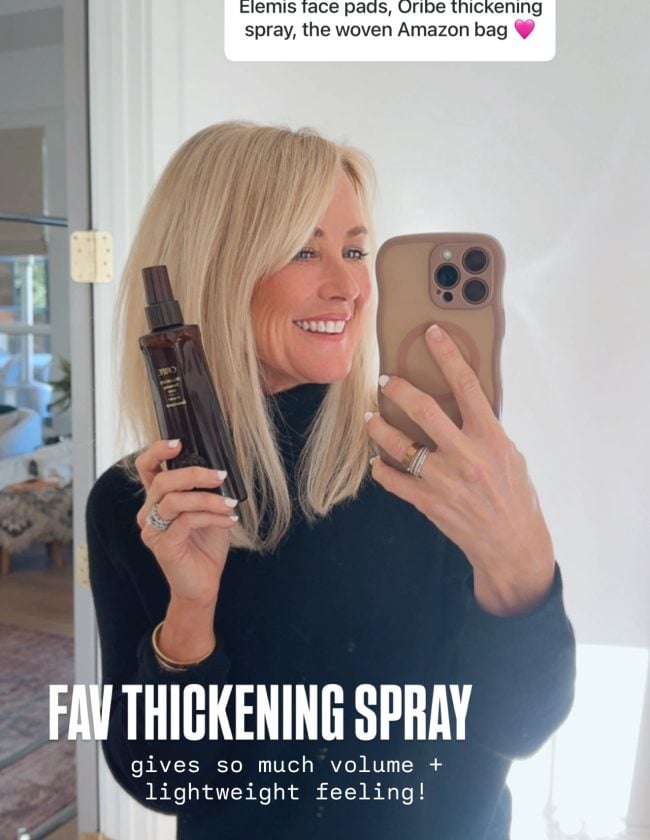
Aveda Thickening Tonic // Gives hair volume & a little grip (I like the Volumizing Tonic, too)
It’s a 10 Miracle Leave-In Product // Great detangler & heat protectant
Aveda Air Control Hairspray (not pictured) // Touchable light hold
Oribe Dry Texturizing Spray // Adds fullness & texture
It’s a 10 Miracle Styling Serum // Seals the ends & flyaways
{Styling Prep}
Shampoo and Condition (I use Aveda Shampure & Damage Remedy. Once a week I shampoo with Blue Malva to brighten my blonde), towel dry
Spray Aveda Thickening Tonic or Volumizing Tonic throughout & at the crown for volume
Spray It’s a 10 Miracle Leave-In on the bottom half of hair for smoothing & heat protection
Comb through with detangling brush to prevent breakage
Dry hair, smoothing with brush in final minute (I like this paddle brush for a smooth blowout)
Okay, now that your hair is prepped and dry, clip the top half up so you can curl by sections. Start with a 1-inch section and quickly run the iron over the hair to smooth any rough spots and seal the ends.

Position the iron a few inches from the roots, and wrap the hair around the barrel, away from the face. I keep the clamp open while wrapping so the main source of heat stays closer to the roots, as opposed to the ends.

Keep the barrel vertical to the head, and don’t curl the bottom inch or so. My hair is short, so it only wraps around the barrel twice.

The goal is to create loose ringlets without curling the roots or ends. If you’re using a wand, just wrap the hair around the iron while holding the ends with your fingers. (See my tutorial for curling with a wand here.)

Once the bottom layer is done, release the clip and repeat with the top layers. I alternate the direction of the curl a few times for a more natural and less-uniform look.

Continue curling 1-inch sections around your entire head without touching or disrupting them.

Lightly mist hair with your favorite hair spray (I love Air Control for a light, touchable hold, or Kenra #25 for heavy-duty hold).


Leave curls untouched for a few minutes to cool and set. This step is what helps them to last. I usually curl my hair first, then let it set while I put on my makeup and get dressed.

Once cool, gently run your fingers through your hair from underneath to break up the curls, and scrunch it to muss up the curl pattern and make them look less polished.

Grab your texturizing spray (this one smells like heaven), and holding the can at least 12-inches from your head, blast the roots of the crown. Make your way around your head, lifting and spraying underneath in sections.


Warm a little styling serum in your hands, and finger-comb your hair back in to place, concentrating on the bottom half of your hair. Use leftover product to smooth the ends for a piecey effect.


Hit it with another light mist of hairspray if you want…and you’re done!!

V-Neck Sweater | White Jeans (30% off!) | Necklace | Lipstick in ‘Punch’

Sometimes I use a smaller barrel for tighter curls, or comb them out while still warm for loose waves. Other times I tease my whole head with a wide-tooth comb for more volume and less curl. My hair has a mind of its own and looks different literally every time I curl it. But I just go with it…trying to force it only leaves you frustrated.

Similar Fair Isle Sweater | White Jeans (on sale!)


Similar Moto Jacket | Best Black Jeans | Pendant Necklace | Clutch | Earrings | Lipstick in ‘Punch’

Stretch Ankle Pants | Jean Jacket (on sale!!) | Leopard Clutch

Striped Tee | Similar Cardigan | Tassel Necklace | Black Jeans | Similar Bag | Sunglasses | Hoop Earrings

Striped Shirt | Jean Jacket | Best Black Jeans | Similar Hat | Sunglasses | Hoop Earrings | Pendant Necklace | Lipstick in ‘Punch’
![]()
Favorite Scoopneck Tee | Sunglasses | Hoop Earrings | White Jeans (on sale!)


Beauty products also make great gifts, so I rounded up a few fun ideas for the beauty junkies on your list. I hear amazing things about the Moroccan Oil and curling iron, and just added the pillow case to my own list!

one. Makeup Brush Cleaning Glove // two. Pillowcase & Sleep Mask // three. Trinket Dish // four. Classic Pajama Set // five. Smart Touch LED Vanity Mirror // six. Curling Iron // seven. Lip Tint Set // eight. Eye Shadow Pallette // nine. Best Red Lipstick (no. 132) // ten. Moroccan Hair Oil
I hope this tutorial and gift guide has been helpful! Feel free to leave any hair questions in the comments, and let me know if you have other beauty-related tutorial requests!
Psst, see more Beauty posts here.
{Shop My Hair Heavy-Hitters}

*Photos by the darling and talented Mary Summers. This post is created in collaboration with Nordstrom, but all thoughts, ideas & cowlick-wrangling are my own. Thank you for supporting Hi Sugarplum sponsors!*