I’m excited to be hosting Thanksgiving at my house this year. Before you think I’ve gone whack…let me elaborate. It’s just going to be my sweet little Sugarplum family and my in-laws….and my mother-in-law cooks most of the food the turkey! So I’m left with a side dish or two to prepare, and the tablescape! Which, let’s be honest, is the real reason I’m excited to host. I love any excuse to set the formal dining room table.
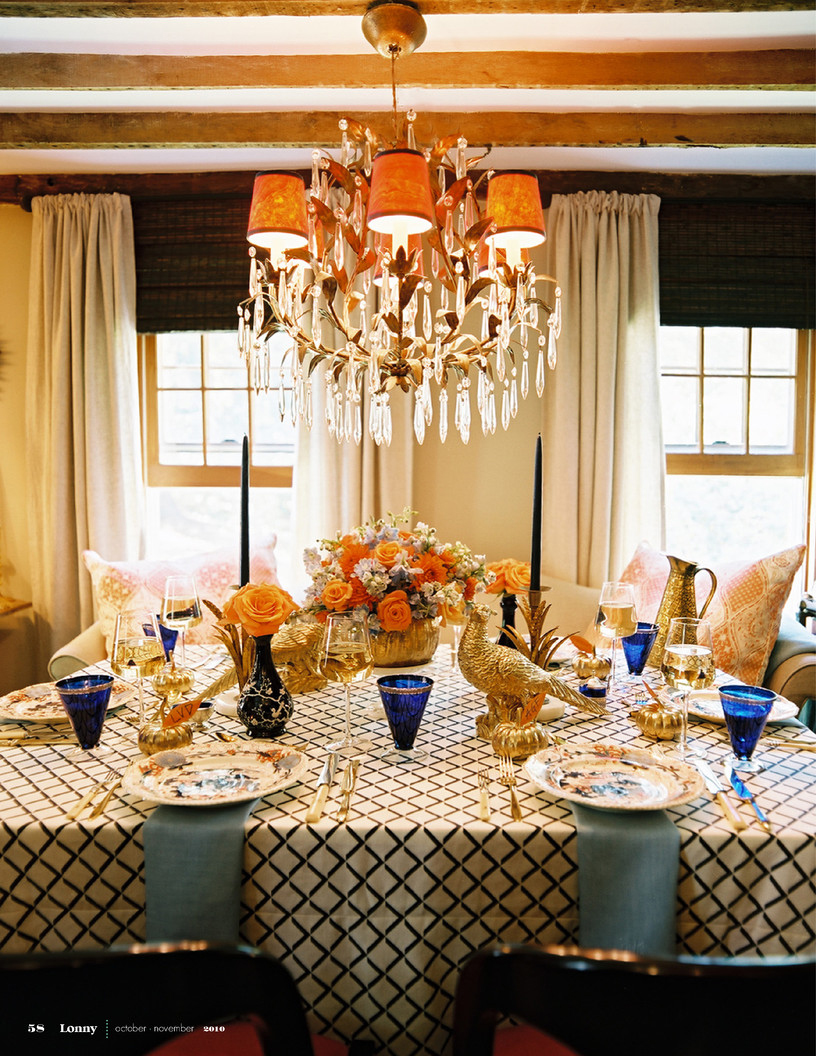
I think everyone has seen this Eddie Ross table from the last issue of Lonny:
I instantly fell in love with it, as did the entire blogging community. I think we’ve made a collective decision to spray our Thanksgiving tables with metallic gold paint this year!
My dining room table is large, so finding a tablecloth has proved difficult. I thought about making one long runner for the center (like I did here), but depending on the width of the fabric, I’d need 3 yards. Again, not a real cost effective idea for a short-term table runner.
Then I came across this image from a great new to me blog, Goodwill Hunting:
Of course it’s an Eddie Ross designed table….the man has skills! The first thing I noticed was the trio of runners. I love how they seem to unite the diners sitting across from each other, allow the table to be seen, and are less cluttered than placemats. I hopped over to Eddie Ross’s blog and found another table gem:
So with the decision to make 3 runners, I set out to find my fabric. I’ve mentioned before how my table feels like a brown Buick parked in my dining room, so I decided to lighten things up. But before I could even make it to the fabric store, I stumbled across this $5 curtain panel at Target:
Fabric found! I played around with it on my table that’s what she said and decided since the ends were finished so nicely, I’d leave the length of each runner 63-inches, and cut the 42-inch-wide into 3 panels. Wow, that makes no sense. Hopefully it will clear up as this “tutorial” goes on.
(This hem becomes the ends of each runner.)
I divided the width of the panel (42) by the number of runners I wanted (3) and came up with 14. But since I only needed to ‘hem’ the 4 edges that were cut (the drape comes hemmed on all 4 sides), I made the center panel wider to accommodate 2 hems, (versus the single hem the other two panels required).
I use a very scientific method of cutting fabric in a straight line…tape it down firmly to the floor tile, then use the grout lines as a straight edge. I didn’t say it was a great idea, but it’s what I’ve got!
After ironing each panel, I folded over the edge to be hemmed and gave it a good, starched crease. This makes it much easier to insert the hem tape:
I can’t tell a difference between my ‘no-sew’ edge and the professionally hemmed edge. If you can, just keep it to yourself.
Things are looking much brighter! I love that each side of the table is brought together by the fabric, instead of split down the middle with a single runner.
Maybe we’ll hold hands across the table and sing ‘Kumbaya.’
Because the ivory color is so neutral, I could definitely incorporate these into several different tablescapes in the future. Or if someone spills red wine on them at dinner, it’s no big deal…only $5 invested!
Tomorrow I’ll show you how I repurposed some of my Halloween decor for the Thanksgiving table. How is your table coming along? Or are you showing up at someone else’s house to be fed this year?
Great idea Cassie! I know I have trouble finding a tablecloth long enough if we put both leaves in ours. I like using runners. Can't wait to see the rest. Keeping ours super simple, with 11 around the table it gets crowded!
I would never have thought of the triple runners, but I love it. I love when you were explaining the tutorial and said "that makes no sense"! Ha! You're so crafty – way to repurpose!
Love the triple runner idea. Now, what's up with this Good Will Hunting blog? It doesn't exist? Were you just trying to get me all hot and bothered with a neat idea for a blog? ;-p
I love this idea! Never seen it before. I'm excited for tomorrow to see how you're going to repurpose Halloween decor! Hope you have a fabulous day, Cassie! (:
I love how you cut on the grout, but there is an easier solution! (I learned this from the girl at Joann's…)
Rip! Tear it baby, like it… hot? (that's what she said, right?)
no really- when you're working with big, huge, can't-handle-it-without-the-help-of-elves-or-using-the-entire-floor size fabric, look closely at the grainlines, snip, and tear! the only down side is that it does fray a bit more, so I always tear leaving myself about a half inch extra for fraying and trimming. But it'll be much straighter and tons easier.
great find for the table runners… I cant say that I would normally look at a curtain and say "hey this would be a great table runner" I have much to learn 🙂


such a great idea!!
I love this idea!
-Rene
Can't wait to see more! Janell
So chic! Such a fabulous idea. I love the way they are positioned.
http://ashleyanderic.blogspot.com
Great idea Cassie! I know I have trouble finding a tablecloth long enough if we put both leaves in ours. I like using runners. Can't wait to see the rest. Keeping ours super simple, with 11 around the table it gets crowded!
I love this idea! I need to venture into the world of new sew edges. I'm so intimidated by working with fabric. Thanks for the inspiration!
Even better than the runner down the middle since now everyone sort of has a placemat. Excited to see more.
Fabulous! I love runners placed this way!
XO
Kristin
Fabulous! I love runners placed this way!
XO
Kristin
such a great idea, can't wait to see it all put together!
I would never have thought of the triple runners, but I love it. I love when you were explaining the tutorial and said "that makes no sense"! Ha! You're so crafty – way to repurpose!
Such a great idea – its totally giving me inspiration for my table…
You made me laugh when you said "the tablescape is the reason you like hosting!" Totally with you – hee hee!
Rachie xo
Love the triple runner idea. Now, what's up with this Good Will Hunting blog? It doesn't exist? Were you just trying to get me all hot and bothered with a neat idea for a blog? ;-p
I love this idea! Never seen it before. I'm excited for tomorrow to see how you're going to repurpose Halloween decor! Hope you have a fabulous day, Cassie! (:
I love how you cut on the grout, but there is an easier solution! (I learned this from the girl at Joann's…)
Rip! Tear it baby, like it… hot? (that's what she said, right?)
no really- when you're working with big, huge, can't-handle-it-without-the-help-of-elves-or-using-the-entire-floor size fabric, look closely at the grainlines, snip, and tear! the only down side is that it does fray a bit more, so I always tear leaving myself about a half inch extra for fraying and trimming. But it'll be much straighter and tons easier.
i think it looks really good! great job! xoxo
Love this idea. I especially love the idea of 'no-sew' fabric projects 🙂
great find for the table runners… I cant say that I would normally look at a curtain and say "hey this would be a great table runner" I have much to learn 🙂
Thank you so much for the mention! You are such a sweetheart and we cannot wait to see your Thanksgiving table!!
xo
Eddie + Jaithan
You have a great start, I used curtain panel last year in the same way for two runner!!Kathysue
This idea is genius!
Love how crafty you are/this is! I am thinking of this same thing but with no sew burlap – even less sewing type activity! Thanks for sharing!