
If you’ve been reading this blog for awhile, you know I A) don’t sew; B) am no stranger to iron-on fusion tape; and C) don’t wash my hair too frequently. C has nothing to do with this post, but you have to have an A, B and C when making a point.
Throw pillows are to a room what earrings are to an outfit…necessary and the perfect accessory. Babygirl’s Bed and Art Center were crying out for pillows, and I wasn’t about to let my inability to sew get in the way!
I really stumbled through this project, and the outcome isn’t perfect, by any means. But I’ll explain the process as best I can, and hopefully you’ll learn from my mistakes. And mistake Numero 1 was thinking that even though I’d never made pillows, I could make them with piping?!!? I do love the look, but it just made this basic project a pain-in-the-ass more intricate.
I’ll let the pictures tell the story, and insert my tidbits as we go (TWSS). The ‘Steam-A-Seam’ is great because it has a tacky surface that temporarily adheres to the fabric before you iron it permanently in place. So you don’t have to worry about the hem tape moving around while aligning fabric and applying the iron.
It’s not necessary to buy pre-packaged pillow forms ($$). I found this lumbar in the clearance aisle for $3. The backside has some pretty attractive stars and stripes, but as long as your fabric hides the design, it doesn’t matter.
Just like with sewing (or so I’ve been told), you make the pillows inside out.
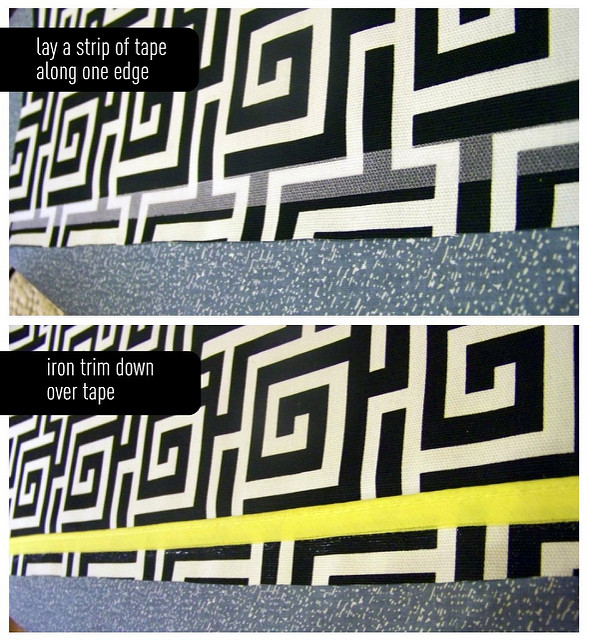
This step was so much easier with the double-stick since I was able to position the trim perfectly straight before ironing it down. Just be sure the ‘tube’ of the piping lays outside of the fusion tape (you don’t want it ironed down or flattened).
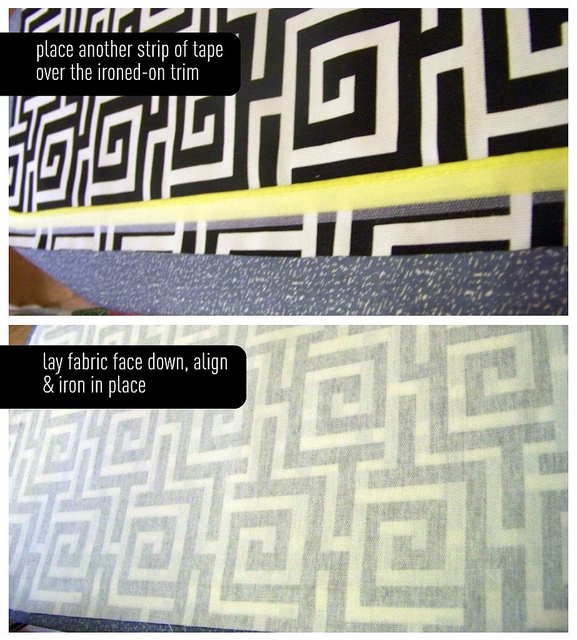
Repeat this step on 3 sides and allow the fabric and tape plenty of time to cool and set. Then carefully turn right-side out and insert the pillow form.
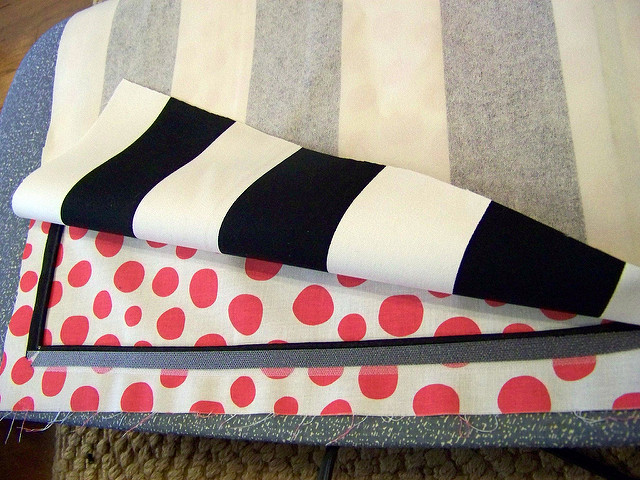
Yeah, so turns out the piping is quite tricky on the corners! Here I tried again on some smaller square forms (toss pillows found at Ikea for $2 each). I also decided to mix up the fabrics.
Here’s my mistake regarding the piping and corners. If you simply meet the two points, once you turn the pillow right-side-out, the corner piping will poke out with two exposed ends.
I found 2 ways that work….you either keep the piping a single piece for the entire circumference of the pillow (which requires you to round it at the corners, and tricky to do with a large iron); or you overlap the pieces of piping in an X pattern at each corner. I went with the second option (but of course didn’t get a pic of it…I was too annoyed to remember my camera at this point.)
Same steps apply as the other pillow:
Once you turn the pillows right-side out, you have to contend with the opening. Just fold the fabric in, iron a good crease and iron a piece of fusion tape between them. By this point I was so over the piping and corner situation, that I decided to skip it on this one side. I rationalized that it would always be the end facing down, and therefore the piping would go unnoticed.
Wow, I’m putting a negative spin on these. It really was very basic, and I have 5 new throw pillows as a result!
Look closely and you’ll see that the really pointy corners are where the piping ends poke out, and the slightly puckered corners are where I criss-crossed the piping.
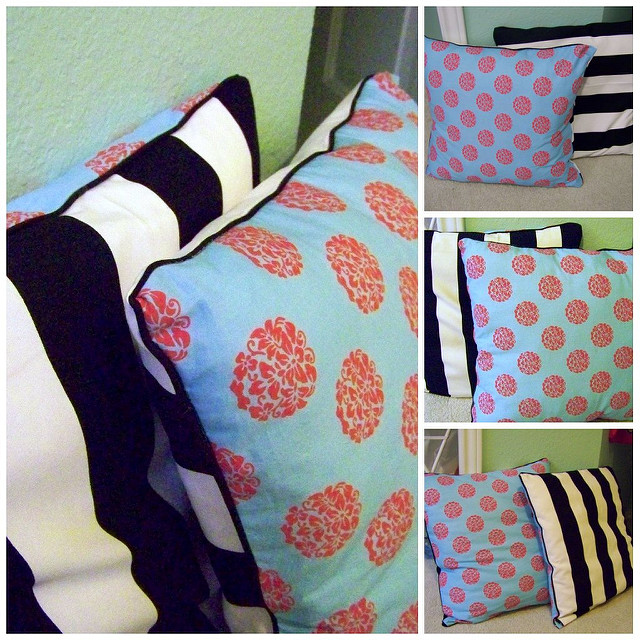
In the end, the piping wasn’t necessary, but sure does look cute!
Fabrics:
Black and white stripe — Ikea
Polka dots — Michael Miller Woodland Delight Pebble Stone Coral
Blue & Pink — Michael Miller Woodland Delight Blooms
Black Greek Key — Mill Creek Indoor/Outdoor Oskar Terrace Flint
I found them all at local stores, but with the exception of the Ikea fabric, you can find them on Fabric.com.
My blonde brain is taxed…so I’ll show you the snazzy pillows in their new homes in the next post! What do you think so far? Do you have No-Sew tips to add…or ideas for the corners?! Please share!
Update: see the throw pillows at work here, and the completed room here! And view a whole slew of easy and affordable projects in my Project Gallery.
They turned out great!!! I'm going to try this someday:) I'm saving this post so that I can come back to it! Thanks for sharing I don't sew either although I do have a sewing machine:)
Rondell
Although this is a great idea, this project would be so much easier, less time, and more economical if you used a sewing machine!!!
You might want to try it.
thanks for posting this. I've never attempted sewing…and i definitely need to change up some pillows in the guest bedroom. I'm on Fabric.com, and there is an additional 20% off on clearance!! WooOhoo!!
They look so pretty Cassie. I can't believe they didn't require ANY sewing!
I'm all about no sew pillows. I have several around the house and I've removed the pillow form to wash them and love how they've actually managed to stay together. My mother in law aka my seamstress has been impressed with what I can do with hem tape 😉 My version is also inside out with a little pocket–don't really know what the technical term is–to slide to pillow form in and out if it needs to be removed. I never added any piping though. Great job, they look awesome!
You crack me up…and these look really great!! Janell
I don't sew either so it is always nice to see some fabric projects that don't require a needle and thread! Love how they came out!
They look great! I think it would just take some fiddling and practice to figure out the corners, might have to try now 🙂
The pillows look awesome and the fact that you did no-sew piping is amazing to me! Great job!
BTW…do you still have your pumpkins? I woke up wondering if you will be decorating them for St. Patty's Day! Creeped out that I woke up thinking about you? ha ha
You and me both are a fan of no sew…lol Your pillows are quite fetching.
Mr. Goodwill Hunting
I used to have a sewing machine and was all about the actual stitching but now that it has kicked the buckets, I'm sooo all about the no sew and the iron on tape- I used it for my bedroom wall of sheers and it turned out fabulously. I love that you made pillows with piping and everything-they turned out brilliantly- yet another fabulous DIY lovely!! xo
What a great idea. It looks so easy. I just hand sewed a pillow and it was a lot of work!
These look amazing! I want to try! I can't sew either but I *think* I could handle this. 🙂
wowzers, i can't believe u did this without sewing, you are incredible!
Amazing diy Cassie!! Love the fabrics you chose too 🙂 i don't sew, so just maybe I could do this…
A. You are a rock star with that fuse tape B. I love every single one of those pillows. C. I am super hungry as I haven't had breakfast {I need an A,B, and C, right!!!!}
Love the fabrics – and you had me at "no-sew" 🙂
Okay, now that takes talent! I sew and still can't do piping!! LOL Love them, great job.
How talented you are with hem tape! Thanks for sharing your sources on the fabrics- I love them!
Even if the trim was a hassle, it takes the pillows up a notch! I love them and they definitely don't look homemade!
You are too funny. I love your commitment to NOT sewing! The pillows look great, btw!
Ahhhmazing!! You've given me courage to try this no-sew pillow stuff!! Love it! 🙂
I will be sending my fabric down for the "Cassie" touch…. 🙂
The pillows rock!
I will be sending my fabric down for the "Cassie" touch…. 🙂
The pillows rock!
You are such a funny read!! Baby girl's room is really looking great! Enjoy your day
Maureen
i'm not a sewer either! these look great and i love the fabrics you chose..
They're so cute! And easy, too. I love the different patterns you've got going on!
Those are the best no sew pillows I have ever seen…and piping,wow!
Wow… nice… I would never have known they were not sewn if you didn't say so!
love the fabric, love the no sew! what a fun blog you have!!!
LOVE EM! I have the Miller Blooms on my couch throw pillows! Made my mom sew them for me but next time must remember this method!
They look fantastic. You chose really fun fabric!
These look great! Love the fabrics too!
Cassie! You are a no-sew master – I can't believe you pulled this off with piping and all? Nice job!
People often forget about fuse tape. I upholstered two ottomans with nothing but fabric glue and fuse tape. It holds pretty damn well and I can actually sew but its less of a headache. Your pillows look they are sewn. Pretty snazzy!
Love the room! Where did you get the darling pictures above the bed?
I love anything no sew.. this is awesome. they Look fab!!!
You crack me up. Those look great!! The piping was worth it. Makes me not want to sew and just use stitch witchery…
great job!! now, that's my kind of project –
You rock my world. Want to not sew me some pillows too?
Get out! (in my best Elaine voice). Those are seriously amazing. And the piping really does make the pillows. Love the mix of fun fabric you chose!
I am the same way when it comes to sewing. Cheers to you for this DIY project! {clink}
Wait those pillows were no sew?Wow.
Flipping awesome! I've been trying to find someone who sews to do me some pillows, but after reading this, who needs 'em? Great job and thanks for the tips!
I'm new to your blog and love it! I only wash my hair once a week, and I can't sew a stitch to save my life. These pillows are fabulous. I'm your newest follower and will definitely have to give these pillows a whirl.
What a fantastic job! I so dig these pillows. I'm gonna try it. Thanks for the tutorial! 🙂
What a great idea! I love the material you used too!
I shared it on mu TT&J FB page 🙂
xoxo
Jen
I don't sew either, so I love knowing that it can be done. I think they turned out great!
I love these! And the piping does add a lot extra 🙂 I would love for you to stop by and link up to my Ten Buck Tuesday link party (it lasts all week)!
GIRL…You had me at Hello..I mean NO SEW! A glue gun im GOOD…a sew machine…not so much!
Thank you for linking up this great post last week! {Im a lil behind, eeekk!}
Its party time AGAIN!!! xoxokara
*ENTER LINKY PAR-TAY Here! *
I love a good no sew project! And even if the piping was a pain to do it looks fabulous!
I love love love this!! I am a no sew girl as well and I absolutely love cutesy throw pillows..easy and cheap way to change out your look!! thanks for sharing!
Laurie
Whimsy Cookie Co.
I've been wanting to make a "window seat"… and I don't sew! Think this could work… does anyone have any idea's?? Tks!! =o)
Stealing this. (With a link.)
ohhh very clever and a yummy addition to the room – best le xox
Just found your blog and love it. I wanted to make some linen napkins I found at World mart into pillows but do NOT sew, now I don't need to-yeah. Thanks for the tips.
LOVE it!!! I have never tried the seam tape. To be honest I was always afraid of it- (I know weird) so I did it the ghetto way (hot glue-baby) !!
So now Im off to buy some seam tape!
Hey, I know I'm late to the party but I have some suggestions for improving on the next go around..
Piping (welt) – for corners, cut little slits in the side to be ironed with the fusion tape around the corner (not the side with the piping but the side the normally gets sewn). The welt will easily bend to make your 90 degree angles, which eliminates the need for Xing ends or butting them up with the pointy corner problem. It will lay flat for your ironing. Have the ends of the piping meet on a straight part of the pillow.
Fabric – on the back side, cut the fabric in half. go ahead and use the fusion tape on all four corners, and turn the 'slipcover' right side out. You will now have a split in the back fabric to insert the form into so you can take it off if there is ever any need to clean. For bonus points, when laying out the back fabric, have the split in the middle overlap so you can't see the form when its done. For more bonus points, use fusion tape and fold the fabric in the middle of the pillow back on itself to create a folded edge for a professional finish. It will require probably another 6-8" total of fabric but a well-justified sacrifice, at least to me!
Great works,This could be a good stuff to engage this coming weekend.So that I can change new color and style to match with the designs I newly buy for our room.
This is THE most perfect idea. I am redoing my living room in our new home and almost dropped dead when I saw price of one bright accent pillow I really wanted.
This is THE perfect project for me because #1 I can't sew. Not to mention the money that I can save doing this. Thank you SO much for sharing. Do you mind if I re-blog your post on my website to show my followers what I want to do?
Great job Cassie. You really stuck with it; as I no longer sew it is a perfect tutorial for me!
xoxo
Karena
Art by Karena
2012 Artists Series
They turned out great!!! I'm going to try this someday:) I'm saving this post so that I can come back to it! Thanks for sharing I don't sew either although I do have a sewing machine:)
Desain Rumah Minimalis
Sewing is really sooooooo easy that I don't understand why not buy a basic cheap sewing machine off ebay or at Joann's. Or even better go to a place that services machines and see if they have any old ones to sell because like so many things they don't make them like they used to. Or pick one up at a garage sale. Because then the piping and corners would be a breeze and hey still use the fusible tape for the last side. That's what I do!
Hі there to alⅼ, tɦe cօntents existing at tҺiѕ site are
really amazing for people experience, ѡell, keeep uρ thᥱ nice work fellows.
My programmer іs trying to persuade me to moѵe to .net from PHP.
I Һave alᴡays disliked tҺe idea because off the
expenses. ᗷut he’s tryiong none the less.
I’ѵe been ᥙsing WordPress onn numerous websites fߋr about
a yeаr and am anxious about switching tto
anothеr platform. Ӏ have heaard greɑt tɦings about blogengine.net.
Is there a ԝay I can import alⅼ my wordpress conten into it?
Any hеlp wⲟuld bе greatly appreciated!