{DIY} Metallic Lined Lampshades

Hello m’dears! How was your weekend, besides too short?! Ours was jam-packed with all the best stuff….night out with friends, paint, Halloween decor and Mexican food! Try as I did, I wasn’t able to stump you guys with my project plan for the weekend. You clever cookies spotted the gorgeous gold-lined lampshades with no problems.

So how’d they turn out? See for yourself!

100_5346

Love, Love, Love! And it was a really simple makeover, so love it more! I thought about lining them with gold paper like Jenny, but decided to try the Metallic Masters I used for the side table (that way the golds would be cohesive, as well). Since my lampshade has a liner, I was able to paint directly on it. Some shades have paper liners, mine is a polyester of sorts, which worked out fine.

See how much is going on…gold finial, silver frame, white liner? Looks like it was patched together. Oh wait, it was! But certainly not the look I’m going for.

100_5316

Using a small craft brush, I painted around the lip, careful not to get much paint on the black fabric.

100_5337

And did the same along the seam.

100_5340

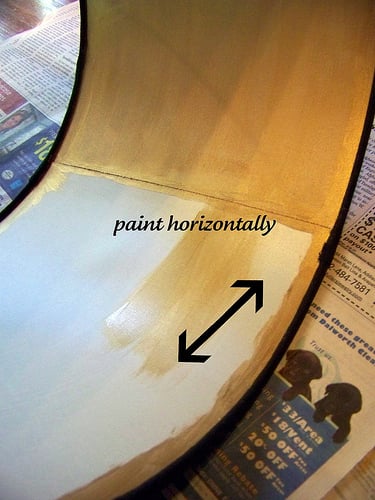
Then I switched to a foam brush (to avoid brush strokes showing through when the lamp is on), and painted the entire shade, keeping the lines horizontal.

100_5341

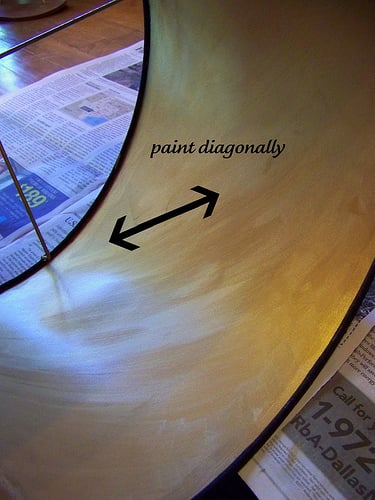
For a more even coverage and smooth finish, I painted the second coat diagonally. You want to keep the saturation of paint consistent all the way around, or some spots will be darker when the light is on.

100_5342

The last step was to Rub ‘n Buff (yep, using it as a verb now, it’s that good) the finial and frame.

100_5326

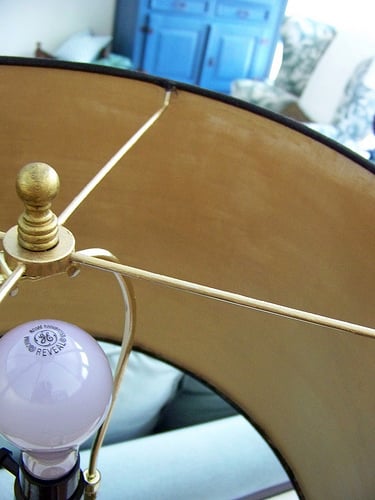
Now all the parts are a happy, gold family!

100_5361

Pretty big difference, no? I love how the gold really pops off the black shade.

100_5331

It certainly kicks them up a notch, and adds more glamour to the room, dahling!

Picnik collage

100_5346

Picnik collage

Hold on to your hats for the money shot….this shows the true glow they give off at night.

100_5369

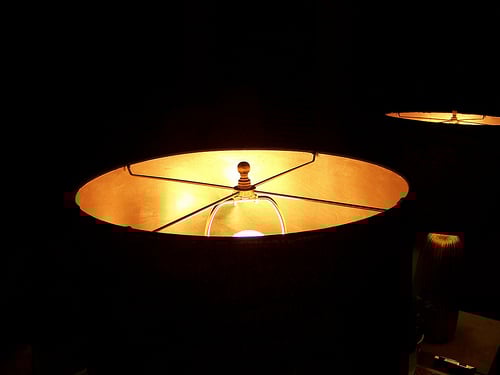
I blew this picture out so could see what I mean about getting consistent coverage with your paint, and why I changed directions of the brush strokes between layers. But it’s not noticeable in person.

100_5371

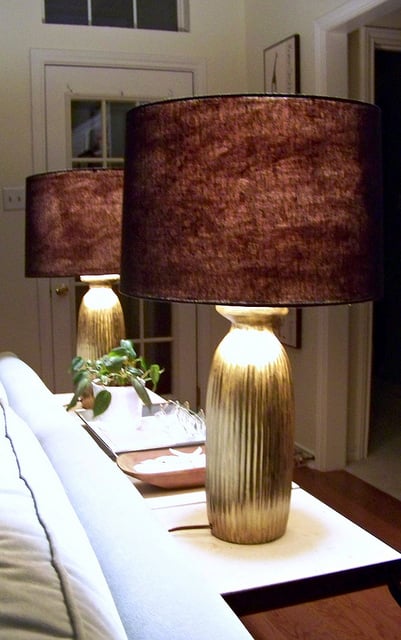
And since I had the paint out, I did a quick layer over the coppery finish of the lamp base.

100_5320

They looked a little tarnished to me before, but now they have the right about of brightness.

Picnik collage

And one more because I just can’t get enough.

100_5356

It doesn’t look like a $30 Home Goods lamp any more, does it? I’d better be careful with the gold though, it’s close to looking like Liberace lives up in here!

LIVING ROOM TO-DO LIST
Paint Hall Chest
Paint/Wallpaper Nook Walls
Paint Backdoor? Nope
Add Nailhead to Wingchair
New Covers for Barrel Chair Cushions
Customize Lamps
Clean Secretary
Gold Leaf Back of Secretary
More Coordinated Sofa Pillows

Leave a Comment

45 Comments

  1. Katie wrote:

    Wow–love the lamps! Beautiful and glamorous.

    Posted 10.10.11 Reply
  2. Kim @ keller-creative wrote:

    I love this idea. They look great.

    Posted 10.10.11 Reply
  3. Shelley wrote:

    This is such a neat idea, and they look amazeballs!!!

    Posted 10.10.11 Reply
  4. JENNIFER L. GRIFFIN wrote:

    Wow! What a difference! I need to find a project to try that on…

    Posted 10.10.11 Reply
  5. Simply LKJ wrote:

    They look fantastic Cassie! They really tie everything in the room together.

    Posted 10.10.11 Reply
  6. A Vintage Vine wrote:

    Cassie, they are wonderful! Thanks for the how to…you made it look easy! FYI, love your couch!

    Posted 10.10.11 Reply
  7. Courtney {a thoughtful place} wrote:

    I was curious if you would paint or spray them. They turned out super cute. They even look great when the light is off.

    Posted 10.10.11 Reply
  8. Jeanine wrote:

    What a tranformation! Gorgeous!

    Posted 10.10.11 Reply
  9. Lili wrote:

    greatd idea! gives it a finished look!

    Posted 10.10.11 Reply
  10. Kelli wrote:

    haha! Liberace! great job :o)

    Posted 10.10.11 Reply
  11. Mr. Goodwill Hunting wrote:

    It looks really great! I tweet a picture this weekend of a highboy that was $49 and I thought of the yellow one you painted.

    I just scooped up some rally great shades as well.

    That metallic is certainly GOOD stuff!

    Rashon aka Mr. Goodwill Hunting

    Posted 10.10.11 Reply
  12. natasha {schue love} wrote:

    Amazing makeover! They really look finished now. So rich and high-end! Great job {as always!}. 🙂

    Posted 10.10.11 Reply
  13. Chassity (Look Linger Love) wrote:

    Oh my gosh Cassie that is the bomb. What a brilliant idea, they look like a million bucks.

    Posted 10.10.11 Reply
  14. Lil Mama Stuart wrote:

    ooh what a difference! Would never think to do that

    Posted 10.10.11 Reply
  15. Amanda wrote:

    Gorge!!!! Its amazing what little touch of gold will do.

    Posted 10.10.11 Reply
  16. Danielle Oakey Interiors wrote:

    Love it. I am on the hunt for he perfect lamp for my desk and I defiantly want to add some love to the inside. Do you think you could paint any color?

    Posted 10.10.11 Reply
  17. Marianne wrote:

    The gold lining is much more gooder!

    Posted 10.10.11 Reply
  18. Aubrey {All Things Bright and Beautiful} wrote:

    It turned out *perfect*…and don't worry, you still don't hold a candle to Liberace…which is a *REALLY* good thing! I love the soft glow of the gold with the lamps on! You and Mr. Sugarplum need a romantic night in with your new lamps (c: hehehe…

    Posted 10.10.11 Reply
  19. Ali Richardson wrote:

    GORGEOUS!!!!! Gold -it-up baby!

    Posted 10.10.11 Reply
  20. A Blissful Nest wrote:

    love it! You are just too talented my dear!!

    Posted 10.10.11 Reply
  21. Anonymous wrote:

    They look fantastic! Excellent job!

    Posted 10.10.11 Reply
  22. Megan Lee wrote:

    Wow- I love this look. I never would have thought to do this but it looks fantastic!

    Posted 10.10.11 Reply
  23. Shanna wrote:

    Wow! They look so glam and expensive! We all must have lamp on the brain because I tackled a lamp redo in my own space this weekend too!

    Posted 10.10.11 Reply
  24. thedistractedblogger wrote:

    I agree they "fit" that much better in the room now. If only I had surfaces for lamps. 🙂

    Haley @thedistractedblogger

    Posted 10.10.11 Reply
  25. A Lived in Home wrote:

    Oh so fantastic Cassie!! It's a much more cohesive look now! The glow at night is so romantic. I bet it makes you just want to sit and stare at them! I would!

    Posted 10.10.11 Reply
  26. Amy wrote:

    Cassie- where did you get your black shades? I'm having a really hard time finding any. Thanks! Amy

    Posted 10.10.11 Reply
  27. Emily @ A Well Dressed Home wrote:

    What a difference! They look awesome!

    Emily Hewett
    A Well Dressed Home
    awelldressedome.com/blog

    Posted 10.10.11 Reply
  28. Sara @ Russet Street Reno wrote:

    They are very 'hollywood'!

    Posted 10.11.11 Reply
  29. Brittany {Gallery No. Eight} wrote:

    Love this idea!! I need to buy some new lampshades and I just love the effect gold lined shades give! Fabulous job 🙂

    Posted 10.11.11 Reply
  30. Sheila wrote:

    So much better! I'd love to know more about your sofa – where did you get it?

    Posted 10.11.11 Reply
  31. Megan {Honey We're Home} wrote:

    So chic Cassie- what a great idea! I didn't think they looked bad before, but they look 100% better now!

    Posted 10.11.11 Reply
  32. Chic Coastal Living wrote:

    Girl!!! You are good! How in the world did you think of doing that! love it!

    Posted 10.11.11 Reply
  33. Anonymous wrote:

    Love the idea and would like to try it myself one of these days. My biggest challenge is finding lampshades. Do you have a source for drum shades that you could share, Cassie? dcrim4@gmail.com

    Posted 10.11.11 Reply
  34. Amber wrote:

    Beautiful!

    Posted 10.11.11 Reply
  35. christine {bijouandboheme} wrote:

    LOVE THEM!!!!

    Posted 10.11.11 Reply
  36. Stacey wrote:

    Wow, definitely an improvement, and they look more cohesive now for sure!

    Posted 10.11.11 Reply
  37. A Delightful Design wrote:

    You are a genius! a DIY Goddess. I have been dreaming of doing the same thing to a certain shade in my home–and now I know how! Thanks. I pinned this, of course.
    xx,
    abby

    Posted 10.12.11 Reply
  38. emily wrote:

    What a difference that makes! They look perfect in the room!

    Posted 10.12.11 Reply
  39. Ceu wrote:

    Seus trabalhos sào lindos,adoro visitar seu blog.
    Parabéns e bjs

    Posted 10.12.11 Reply
  40. Cassie @ Primitive & Proper wrote:

    love the touch of glam that the gold paint adds!

    Posted 10.13.11 Reply
  41. Beth @ Free Stylin' wrote:

    I better type this fast…I'm on my way out the door for Mexican food myself! But I couldn't not comment…Your lamps look fantastic! SO glad you gave this tutorial…I have two lamps that I was hoping to do the same thing to. I just wasn't sure how to go about it. Thank you!!

    Posted 10.13.11 Reply
  42. Sherryd wrote:

    Loving the glam you added! I really like them!

    Posted 11.8.11 Reply
  43. Lisa wrote:

    Could you please let me know where you bought the paint?

    Posted 10.15.17 Reply
    • Cassie wrote:

      Hi Lisa! I found it at a local hardware store that has specialty paints! ox

      Posted 10.15.17 Reply
  44. Cheryl wrote:

    Thanks for this! I found two lamps with shades like this at Home Goods but, of course I wanted to think on it a minute and when I went back to get them, they were gone! These look gorgeous and I think I can do this. Also, where did you get that amazing, comfy, and luxurious looking sofa?

    Posted 4.20.18 Reply