
Are you ready to be mildly wildly impressed?!? Are you like me and easily wooed by an easy and inexpensive DIY project? Then today’s mega-post is for you!
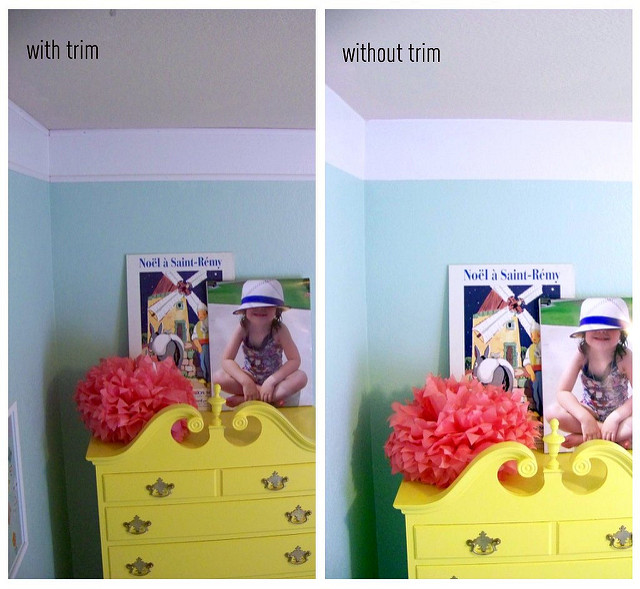
A major component in Babygirl’s Room is complete….the Faux Crown Molding!!

Love it? What if I told you the total cost was $30?!? Now you’re impressed! Here’s the ‘How-To.’
I’ll save you oodles of time wandering the aisles of Home Depot, while on the phone describing every possible option to your aunt, and just tell you what to get!
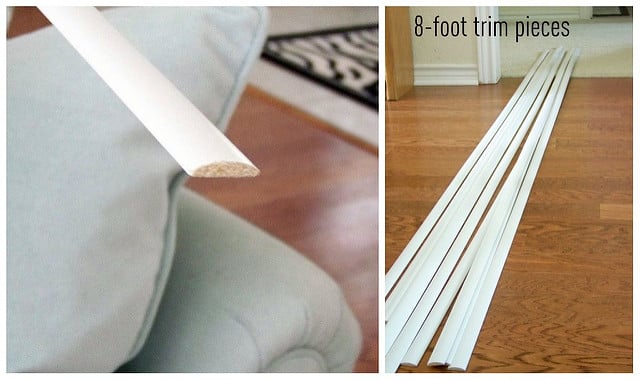
This 1-inch trim is literally like a condensed foam (you could dent it with your fingernail), weighs virtually nothing, comes in 8-foot strips, and costs $2.38 each!
First measure the perimeter of your room, then double it (for two rows of trim). Then divide that number by 8 (length of each trim piece). That’s how many pieces of trim you’ll need. I needed 95 feet, or 12 pieces, for a total cost of $29! I was feeling spendy and picked up an extra piece in case I goofed.
I’ll help you out again and tell you that even though these things are light as a feather, they do not want to be glued to the wall (even if you tape them in place and curse them up and down). But since they are so lightweight, and not a solid material, a simple finishing nail with a little teeth is all you need to adhere them to the wall.
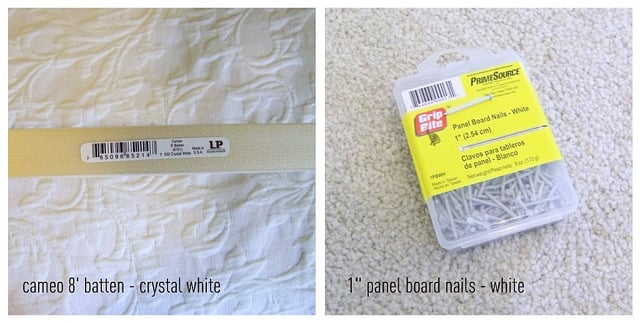
Most average rooms will require very few cuts since there are 4 straight walls and these pieces are so long. Babygirl’s Room has a bit of an alcove where the door is, so we had some smaller sections to contend with.
First I started with a full 8-foot piece and hung it by tapping in a nail every 18-24 inches. I did this on all the main walls and was left with a single space on each wall that required a smaller piece (plus the alcove).
To cut smaller pieces, simply measure the space and follow this pictorial demonstrated by my cute helper:
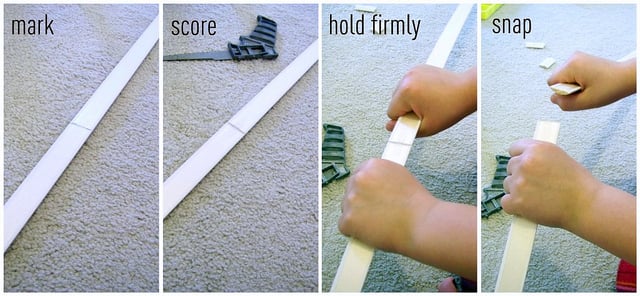
Don’t worry if it’s not a completely clean break. Mr. Sugarplum rubbed a little spackle (so much easier than caulk) over the seams to bridge the gaps, then lightly sanded it down once dry. I didn’t bother covering the nails since they are white and teeny-tiny, you don’t even see them from the floor.
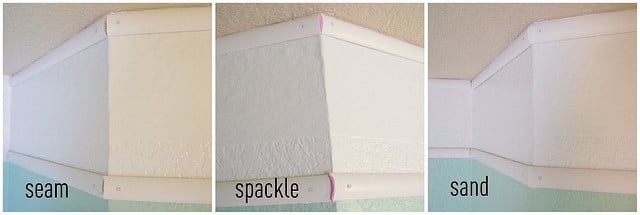
Of course I found some discrepancies in the wall and the trim bowed in a few spots. No problem, just tap in a nail and it will lay flat.,

A few trips up-and-down the ladder, and Voila!

I could have left it with just the stripe and it’d have a similar effect. But the trim gives it a little heft and dimension.
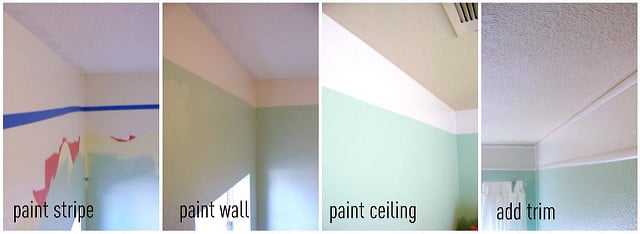
Here’s the process again (read about it here and here):
I am thrilled with the outcome. I think it gives her room the added interest I was looking for, and my mishap became a blessing in disguise because I’m in love with the painted ceiling!
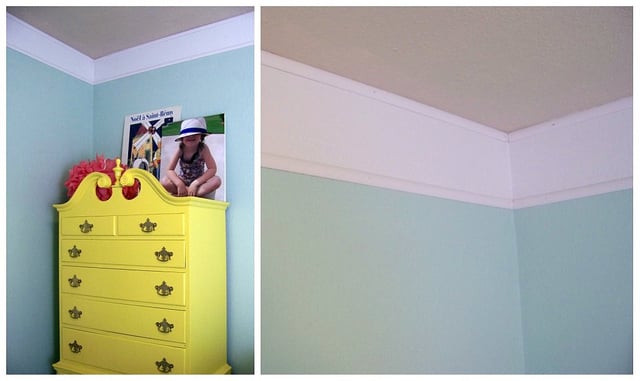
True I could have installed a traditional crown molding…but it would have cost a lot more, and been extremely labor intensive (anything requiring a saw becomes too laborious for me!) My investment for this project was $30 in materials and a couple hours of time. And the trim pops out pretty easily and leaves only a pin hole if I change my mind later.
Here’s the door alcove I mentioned (and a glimpse into the Dining Room, where drapery samples are taped up!)

I love the mirror hanging over her door…it reminds me of a transom, and reflects the beautiful ceiling! I’m forcing myself to partially ignore the fabric samples laying all over my house until this room is complete.
So what do you think of my Faux Crown Molding? Do you have any faux treatments in your home?

What a great idea. I would've never thought to do this.
That's genius Cassie. Need to put on my Facebook page today with your permission. What a great idea!! And I so love your daughter's yellow highboy!
Your faux crown molding looks great Cassie!
Look at you…do I now have to go add this to Isabella's room?! 🙂 What a great idea and it really adds a lot of character. Janell
It looks amazing! I love the look!
JUST WHEN I THINK HER ROOM COULDN'T GET ANY CUTTER , IT DOES! GREAT JOB ! I THINK THE MIRROR TRANSOM IS VERY CLEVER.
Wow! That turned out awesome! Looks like everything is coming together.
Oh Cassie, there you go again impressing the socks off of me- this is RIDICULOUS…in the best sort of way. Gorgeous my dear and the fact that you only spent $30 is just incredible. I would never have thought to do this- very impressive!!!
LOVE it!! May have to consider this idea for my girls' rooms!
sooo awesome!
It looks great! The trim makes it that little more finished and fabulous 🙂
OMG!!! Genius! I am so doing this(in every room in my house, lol!)
I'd have to say that this is kind of genius! 🙂 Brill! 🙂 It looks fantastic!
This is so good and right up my thrifty alley. We make good friends. BTW- the blue and white chevron would work really well 🙂 Now, just DO IT!
Wow! I'm impressed! It turned out fantastic! I have faux wainscotting in my hallway and you'd never guess!
Cassie, it looks great! What a great idea.
SUCH a fab idea! Who couldn't afford $30 for a snazzy looking trim detail like that? I'll definitely be spreading the word on FB and Twitter!
What a great idea! It looks amazing!
What an inventive idea! I'll have to bookmark this. 🙂 Thanks!
Looks great. I like it with the trim myself!
i love the idea and it seems super quick!
i love the idea and it seems super quick!
Look how swanky it looks!! And for 30 bucks and some elbow grease?? Love it!
I have done this idea to beef up base boards and crown before and it works like a charm. When it is all painted the same color and finish, up that high you can not tell. Great idea!!! KS
You go Miss Smartypants! It looks great!
Just noticed how I like the contrast of the ceiling and wall colors, especially highlighted by the cute moulding. Great job!
Awesome, Cassie! Never would have thought of this! So creative (:
Amazing!!! It looks just as good as official crown moulding! Love it!
Love it! I especially love the finishing touch of the trim…that makes it for me! I like that it's just clean and simple…my kind of project! (c: You on with your bad self, girl.
Ok, this officially goes up on my "To Do List" for my craft room remodel next week! Brilliant, thanks so much for sharing!
P.S. If I peaked your interest in the craft room remodel, you can read about it here!
http://www.diyaddict.org/2011/02/tackling-ol-to-do-list-craft-room-part_28.html
Where do you come up with this stuff girl!? You are my DIY hero. I love it.
It looks great! The molding really does make it pop! Love it – I may have to copy you 🙂
Wow. This room is looking great. I can't wait to see the whole thing.
Oh man, brilliant idea!!
And hey look, your blog hasn't blown up yet!!
Wow! I just wrote a post about this…but not in as much detail as you! I"ll let you know when it's up…this looks great, you go girl!
Looks fabulous! Perfectly easy for myself and my tool-challenged husband – ha!!
Such a great idea and it looks so good! How fab! xo
What a great idea. I love how it looks. I would love for you to stop by my blog and link up this post to my Winter Blues Wednesday party. Hope to see you there.
omg you are so brilliant! Love it!
Amazing. I adore you 🙂
Where the heck do you come up with these ideas? This is fab-u-lous.
You finished this up so beautifully! I also think the highboy is fab- and all the color you've used – so pretty!
You have no idea what perfect timing this post is for me. Our bedroom has a chair rail 5 inches from the ceiling..you know..where border used to be in the 80's? Now I know what to do with it now!
Clever idea! and I know you saved a ton of money becasue crown molding is sooooo expensive!
Such ingenuity! It looks great and so much more affordable! Thanks for sharing!
what a cool fake out
Thanks for sharing! I may have to give this a go at my house now. I agree, anything requiring a saw is too much 🙂
It does add that special touch to the room. And I love the cost. Thanks for the inspiration!
What a great idea! I have been playing with the idea of adding crown in my house, but was not looking forward to the labor and tools involved. This sounds like something I could totally handle. Found you on Hooking up with HOH. I am your newest follower.
Ok I'll stop commenting on all of your posts that I missed throughout the week… but I just had to say, this is HAWT. GREAT job, Cassie! Genius idea.
Cassie this is amazing! I have to share this with my readers! I'll be featuring your tute on BCD Tomorrow! Thanks for linking!
The room is looking wonderful! Keep the photos coming =)
This is AWESOME!
I love this idea! I'm so saving this to try out in a few rooms!!! I found your blog at the DIY Showoff. You have such great ideas and I'm your newest follower! I'd love it if you'd follow me back: http://stillwaterstory.blogspot.com/
Again, you did a fantastic job with this!! 🙂
Wonderful! Thanks so very much for sharing this tip/trick! I think it would work really great in a small room, too. I'm following you now, and I'd love for you to come see me at:
http://sceneofthegrime.blogspot.com
Thanks again 🙂
Love this! Such a dramatic change for such a small amount of money. Thanks for sharing! Oh and that picture of your daughter on the dresser is absolutely adorable. I love fun, non-posed pictures and have tons around our house of our girls. And only part of the reason is getting a 1 year old and 3 year old to pose is almost impossible! Thanks again for the great idea!
I didn't know about the light weight trim. I'm going to use that for "framing" in my bedroom.
Your daughter's room looks great.
I LOVE this! Its FAB!!! Come on 'ova and share this at my Linky Par-Tay!
*ENTER LINKY PAR-TAY Here! *
xoxokara
Really cool! I'm not sure if I could get away with any crown molding in our house–faux or not, since are ceiling are actually LESS than 8 feet tall :p
This is such a fabulous idea! I want to do this at my house. I am featuring this at somedaycrafts.blogspot.com. Grab my "featured" button.
You Ma'am are a genius!
This looks awesome and I think it's something I could do. Where did the fabric come into play?
Love it! Can't wait to try it… what did you do with the inside corners? Did you miter them… or did you place one piece on top of the other..? And how wide of a band did you paint the stripe? I have 8' ceilings..
I love milk duds! I like the idea a lot. Our client sent this to me for us to paint her daughter's room. If you want to add a quick crown molding, we like to use a bed moulding. The back of the molding lies flat againt the ceiling and wall like base mouldings so you can make easy corner cuts with a small miter saw.
I love this. Do you think it looks "real enough" for a living room? I would love to try.
I have love love loved watching this room come together! This is super cool and easy!!!
xoxo
Cat
Found this through pinterest… it's so genius I want to run out right now and do this to my living room today!!
OMG! What an awesome idea. Thank you thank you so much!!!
I LOVE this idea. I wonder how it would look in maybe a gold color to add a little bazam to my master bedroom….maybe I need to do a little trial and error photoshopping 🙂
Im so shocked the construction glue didn't hold…that stuff was powerful. The directions do state the material has to be porous – maybe this type of molding isn't?
Hi Cass – Love your DIY (found on pinterest) – not only is it a great idea, it's a fabulous tutorial. Great photos and clear instructions (no need to get lost in the sea of trim moulding at HD – you told me just what to buy – thanks so much!) I'm so doing this in my living room! The ceiling color is genius….I'm off to check out the rest of your blog, i'm guessing you have a lot more great tutorials :0) Lora
That's terrific! That first picture really creates an optical illusion too – I was wondering what the big angular smooth piece was (WALL). This is really a great example of the versatility of foam crown molding.
Well, this post of yours is older..and I just discovered it cause I am searching on "faux" molding. Now I have your WILDLY GREAT idea. This is JUST what I need. I just finished painting my room and I adore crown molding but am so broke no way I can get real wood. .or even the plaster stuff it seems. this is pretty, and SO easy, even a cavewoman like me can do it. I am so happy I found this.
Did you miter the corners?
Yes ma’am! That way you get a clean seam
Love this idea! Although it’s an old post, I still appreciate having found it. My Google search was looking for a faux chair rail. But a link led to another and I think this will work. Possibly for both.