The 80’s called, they want their brass back

Our house was built in 1986, so you know it has some saweet decor details! When we moved in 5 years ago, we took it from 1986 to maybe 2003…give or take a few years. But you know how it is when you buy a house…you hemorrhage money and spend your life at Home Depot and Ikea for the first 3 months. Then you burn out, and run out of money…so progress comes to a roaring halt. You bask in how great it looks, and make a list of the things you’ll get to over time.
“I can’t think about that right now. If I do, I’ll go crazy. I’ll think about that tomorrow.”
Then next thing you know it’s been years and you’re still living with a dining room chandelier that practically has a mullet! So while I’d love to buy the most gorgeous light fixture that’s perfect for the room, I am not Scarlett and Mr. Sugarplum is not Rhett Butler, the richest man in town. (Although, I don’t have to wear clothes made from my old curtains, so I’m not complaining too much!) Here is the dining room the day we saw the house for the first time:
I told you it was bad!
For the first few years, I got crafty with a glue gun by adding ribbon to the shades and putting a bunch of berry crap in it:
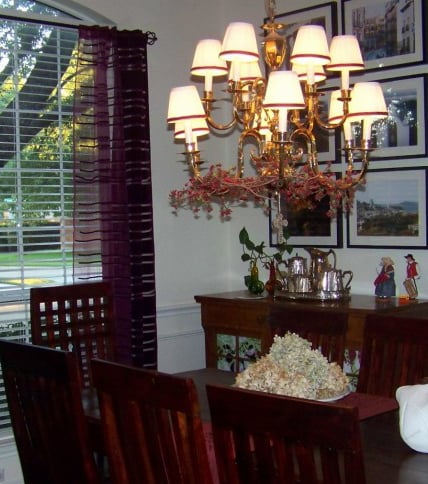
chandy take 2
 A little better, but still pretty dated
Oh, and I also tried sponging it with black paint to give it a ‘rustic’ look
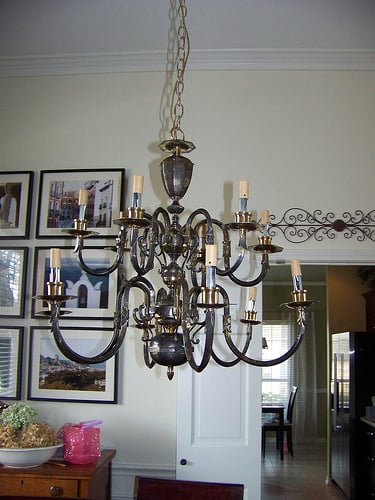
3
But that only made it look moldy?!
Finally I decided to strip it of all it’s gaudy layers, and just paint the blasted thing! Of course I didn’t take it down?!? I just covered everything in sheets, opened the doors, and went to town. Don’t be fooled, it was a hot mess. That black paint mist was going everywhere except on the chandelier and sheets! I kept having to shoo the kids out of the room for fear they’d end up looking like they worked the coal mines. After two coats, this is what I ended up with:
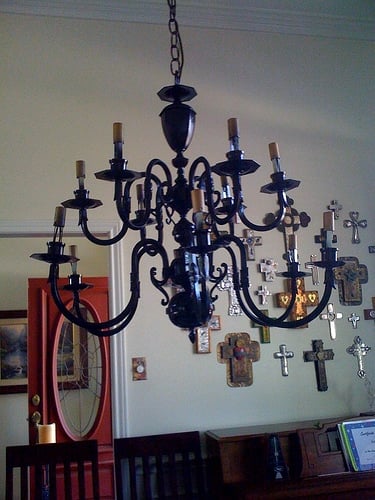
4
I chose Rustoleum’s Glossy Black spray paint. I was going for “elegance” since it’s the unused dining room.
I was sick to death of the little lamp shades, and they contributed to the dated feel…so I pitched them. Which meant I had to do something about the ridiculously unattractive sleeve thingies that cover the electrical part on each light. (yes, that’s the official name of them!) You can buy custom sleeve covers, but those things are $17 FOR TWO! I needed TWELVE! That’s $102 (I went ahead and did the math for you), plus tax and shipping. I could find a new light fixture for that! So I was forced to get crafty again. A couple of sheets of scrapbook paper, some spray mount (and some scotch tape for the stubborn ones that wouldn’t stick!), and I ended up with this:
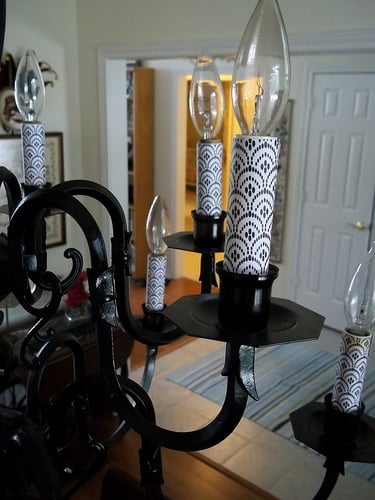
5
cuuuuuuuuuute!
I’ll probably get more adventurous with the paper, and that’s the beauty of it…for the cost of 2 sheets of paper I can customize my light! 
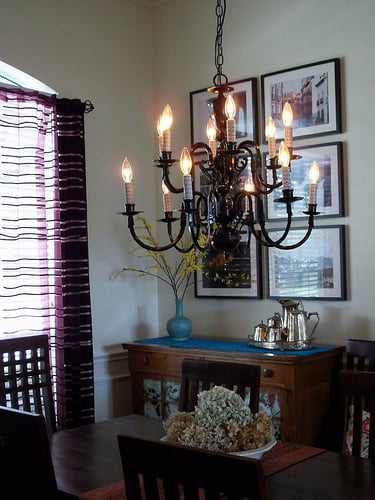
6
Don’t look at my silver, I KNOW it needs polishing!
Would the room look better with a new fixture? Probably. But for $7 in paint and paper, I’m pretty happy with how it turned out. The color addict in me is screaming for me to repaint it a fun color, but I’m exercising restraint for now.
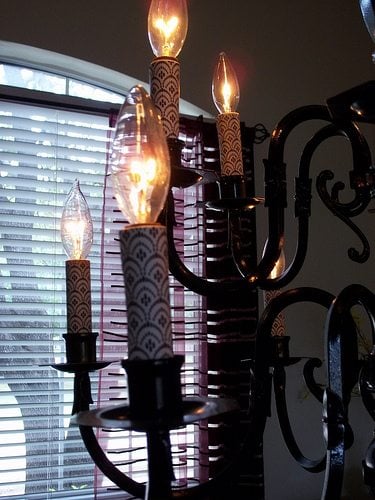
7
What do you think? Have we at least brought it into the 21st century?

Leave a Comment

27 Comments

  1. Kelli wrote:

    You had me from "the 80's called and wants their brass back"!!

    Posted 5.28.10 Reply
  2. Jen wrote:

    I love it! Very creative!

    Posted 6.1.10 Reply
  3. Lori wrote:

    Came via CasaSugar. I love your new look. It's really clever and cute.

    Posted 6.1.10 Reply
  4. Nancy L. wrote:

    Love it. Great idea!

    Posted 6.2.10 Reply
  5. IndySQUARED wrote:

    Love this. What a GREAT idea! I've got the same problem and was thinking about doing something similar but was afraid. . . now I'm not thanks to you!!

    Posted 6.2.10 Reply
  6. ~*yOuNiQuE727*~ wrote:

    What a crafty idea ! I have a chandelier in my garage that I want to re-do but haven't decided what to do yet ~ clever idea, here.

    Love your blog ~ stop by and visit sometime ♥

    Posted 6.30.10 Reply
  7. Robin wrote:

    Such an impressive upgrade.

    Posted 8.11.10 Reply
  8. Sarah wrote:

    awesome!!

    Posted 8.11.10 Reply
  9. Meg wrote:

    I believe you have successfully entered the 21st century. Congrats! I can't believe you spray painted in your house! BRAVE woman! ;)I love the paper choice. It's very cute all together!

    I'd love for you to check out my blog for a fun giveaway!
    http://alittleknickknack.blogspot.com/2010/08/another-csn-store-giveaway.html
    Have a great night!

    Posted 8.12.10 Reply
  10. Centsational Girl wrote:

    Love those sleeves, they add just that extra flair !

    Kate

    Posted 9.14.10 Reply
  11. KateB wrote:

    totally awesome..I too want to repaint the light fixture in my dr, but am too lazy to take it down. I may have to sponge it 🙂

    Posted 9.21.10 Reply
  12. Condo Blues wrote:

    I didn't know they made sleeve cover thingies for the lamp hardware. I think if I go that route on mine, I'll use paper too.

    Posted 9.24.10 Reply
  13. Christie wrote:

    Coming over from Friday Remodelaholic! I have the same BRASS chandelier and need to change it! Thanks for the great tips! LOVE it! Christie at threepixielane.blogspot.com

    Posted 9.24.10 Reply
  14. Courtney wrote:

    I never would have thought of that. So cute. And I just read your message about comments and it's HILARIOUS!

    Posted 9.24.10 Reply
  15. Shannon P. wrote:

    I love it. I'm posting about my 80's chandelier next week. My light fixture is so bad it has shoulder pads.

    Posted 9.24.10 Reply
  16. CoffeeSnob wrote:

    The blog and the comments are WAY cute! LUV the Chandelier. Found your blog while hunting for chandelier ideas.

    Posted 10.6.10 Reply
  17. Heather wrote:

    I never would have thought to use cute paper on those sleeve things. It looks SO good!

    Posted 4.11.11 Reply
  18. A Delightful Design wrote:

    You are so talented! I never would have thought of this but it looks amazingly better.
    abby

    Posted 5.26.11 Reply
  19. Jen M wrote:

    Love it! One suggestion – have you seen the round bulbs? I forget on which design blog i read this, but the round bulbs can update the look a bit. I tried it in my house yesterday and love the look. Check it out!

    Posted 9.21.11 Reply
  20. DownTheLaneWithDaisy wrote:

    Thanks for the push I needed to transform my chandelier which is a dead ringer for yours(old version). I plan to use a dark, gloss brown.

    Posted 3.13.12 Reply
  21. Jennifer wrote:

    Elegant! So many possibilities with the paper sleeves.

    Posted 4.9.12 Reply
  22. Anonymous wrote:

    I have also used wall paper from discarded wall paper books to make sleeves. FREE! Most home shops will give you the dicarded books without cost.

    Posted 4.21.12 Reply
  23. ashley wrote:

    i just found your blog and as i was looking through your projects, i wont lie, i read this as the 80's wants their BRA back! hahaha

    Posted 6.2.12 Reply
  24. MiniMeStyle wrote:

    Just found your blog and I'm drooling over your updates! Your house sounds like it used to be in the exact same state ours is now, except I think you were spared avocado and rust colored linoleum in the kitchen. (We weren't). These updates look wonderful and are so inspiring!

    Posted 6.19.12 Reply
  25. Angie Hammonds wrote:

    Have you had any issues with the paper getting too hot?

    Posted 6.13.17 Reply
  26. Elaine wrote:

    Just bought some scrapbook paper. I can’t wait to try it’s!

    Posted 7.17.17 Reply
  27. Maria wrote:

    Love the paper sleeve idea! Have been living 11 years with the brass and have finally decided to send it back to the 80’s! I will spray outside as I’m short and can see disaster in the wings if I try to spray up on a latter! Can’t wait to hit the scrapbooking paper aisle this weekend!

    Posted 3.27.19 Reply