Next step is adding some ‘Pizz-azz’ to the mirror over the vanity.
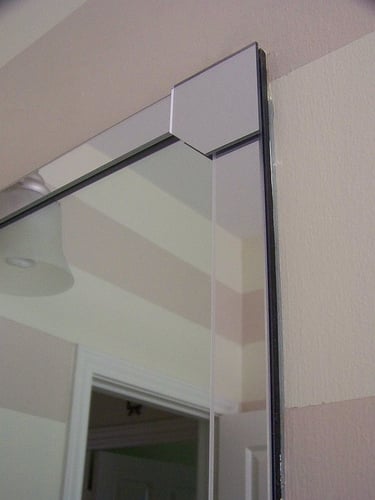
Since I’m only a half-assed blogger…this sliver of the plain mirror is the only thing I’ve got as a ‘before’:
But you can imagine it in your creative minds, right? Basic flat mirror the width of the vanity and the height of the door. (yaaaaaawwwwwnnnnn)
Since I didn’t want to rip it down (and deal with what might be going on underneath?!?! Heck no! We’re going for cheap, remember?!), framing it was my best option. There are lots of ways to DIY some Pizz-azz in your mirror.
You could use crown molding from the hardware store, painted or stained in the color of your choice:
(cottage living)
But that involves measuring, cutting, painting and aligning my poorly cut corners, etc. Too laborious.
You could paint a stencil around the perimeter of the mirror:
(martha stewart)
But that involves artistic ability. Next?
Mirror Mate sells countless options. You simply choose your finish, give them the measurements of your mirror and space, and they send you the complete kit.
But it’s not cheap…ranging between $100-$350 for a standard sized bathroom mirror.
And while I like the above mirrors, I prefer a cleaner look. If I were Mrs. Trump, I’d have a Venetian mirror above the vanity.
(decor pad)
But then eeeeeeewwwwww, I’d be married to ‘The Donald!’ No mirror could compensate for that.
Then I found MirrEdge. They are beveled acrylic strips, and are available in 36, 48 and 60 inch lengths. Don’t be thrown by the acrylic part, these look like real mirrors, but don’t have the weight, break ability or price of them.
For my guest bath, I ordered a 48-inch kit (that included all four sides and 4 corner pieces) and a tube of MirrEdge adhesive….total $37! Score! If your mirror is smaller or larger than the pre-set sizes (as my master bath was…but that’s another makeover), just order the next size up. Simply measure the length you need on each strip, score the back with a sharp blade and snap it at the scoreline with your hands. (warning: the breaking process is loud and will scare the crap out of you each time).
And don’t forget, even if your mirror is a perfect square, two of the strips will need to be shorter so they won’t overlap at the corners.
My mirror was attached to the wall with clips that overlapped the front of the mirror (you don’t want the strips to go over those clips). I simply took them off, put a little silicone caulk behind the mirror, then taped it to the wall with painters tape until it set.
Once you’ve got your four sides measured, dot the backs of the strips with the glue and attach them to the edge of your mirror one at a time. I did the top and bottom first, then the sides. Don’t worry if there is a slight gap at the corner, it will be covered.
One of the best tips that I can offer (and I wish I’d known this before starting!!), is that the bevel is slightly different on each edge of the strip. So decide which edge looks best running along the frame of your mirror, then hang them all with that edge facing out.
The final step is gluing the corner pieces, they go right over the top of the side strips. You only have to hold them in place for a few seconds as it sets quickly.
um, might need a little paint touch-up! thanks zoom lens
Those are just shadows in the pic above, there is no gap between the strip and the mirror.
Once everything was in place, I used clear silicone caulk to seal the outside edges of the big mirror. It just helped to clean everything up.
I’m really happy with how it turned out. And I’ve had no problems cleaning it….I use Windex and just clean it as one big mirror.
I wish they made sheets of this stuff and you could use it to make mirror furniture!! This is the last update on the guest bath….the new faucet is being installed this week, so I’ll have the full reveal soon! What do you think so far?