So by the title of this post, you know this little Mudroom project of mine is a multi-parter. Seems I was a tad ambitious, and slapping up a few hooks just wasn’t going to cut it. The first decision was determining where to create this space since our house has no dedicated landing zone.
Just like we did when creating the Family Command Center, we looked for any unused space, and the back hall leading to the garage was the obvious choice.

There’s no natural light, so the pics are kind of jacked (the wall color is actually the same as our original Kitchen). But what it lacks in light, it makes up for in doors….there are SIX doors in this little hallway?!? Garage, Pool Bath, Laundry Room, Family Room, water heater closet and spare bedroom. So we decided to go ahead and make over the entire hall, and hopefully take the focus off the door parade with a cheater’s version of board and batten.
First, we used painter’s tape to determine the number and placement of the boards.

Light switches and the security system dictated some of it.

Our baseboards are less than a quarter-inch deep, so we needed boards no thicker than that so they’d sit flush on top. Our Home Depot was out of MDF in that thickness, so we bought a large sheet of whatever wood was available (heaven forbid drive to another store!)….but they cut each and every board for us! Free!

One $20 sheet wielded all the boards we needed, and we had them cut some trim as well. Our vertical boards are 2.5-inches wide, and the horizontals are 3-inches. We placed them 60-inches from the floor so the doors would be less obvious. I’m not sure what kind of wood it is, but some of the boards bowed a little, so I was glad we’d cut extras.
There are a million tutorials online for installing board and batten, but we took a pretty basic approach. Mr. Sugarplum hammered the boards to the wall, then used wood glue to attach the trim piece (held in place with painter’s tape until set). Afterwards we spackled and sanded over the nail holes, and caulked everywhere the boards met the wall.

You definitely need to use a nail gun so they’ll be flush with the boards. We just hammered the nails in, and it’s not a seamless finish.

The last step is a few coats of paint. We used the same semi-gloss white as the trim and doors.

True board and batten treatment covers the entire area so there’s no wall texture, but this way is much easier, cheaper, and if you ask me, looks pretty darn good. Especially for a little back hallway.

Placing the boards and trim so high really helps to disguise the doors.

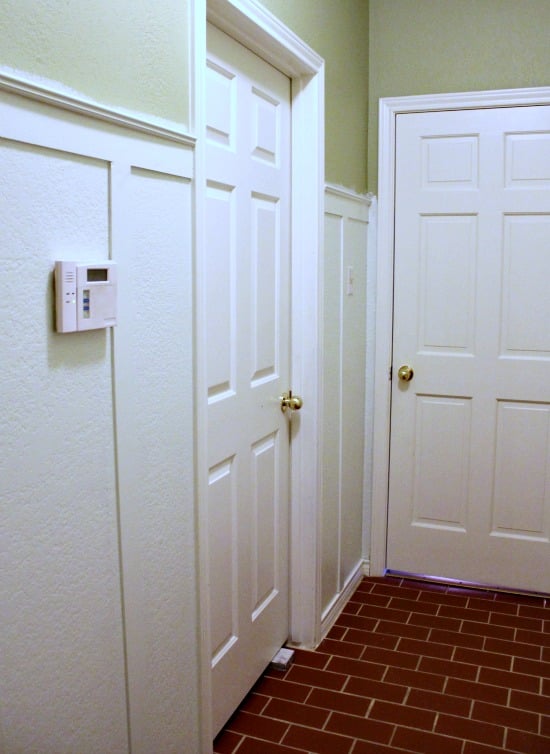
Hard to see the difference since it’s such a narrow space, but here’s the before again…
And where we are today (looking the opposite direction down the hall).

Still, we’re thrilled with the outcome and can’t believe what a difference it makes. Up next, new wall and ceiling paint, something to cover that awful floor, updated light fixture….and oh yeah, hooks and such so it will function as a Mudroom!
Have you ever done any kind of molding or board and batten treatment? Honestly, I am so sick of the phrase ‘board and batten,’ after hearing it repeatedly in blog land for two years. And yet, here I am, saying it 4 times in a post and loving it in my own house! Touche.
Great project. I really makes a big difference. Nice job.
~FringeGirl
It looks great. Now the doors blend in better. Our back hall is like that, except only four doors in the one space. I want to do board and batten but haven't gotten around to it. You make it seem so easy.
Such a HUGE difference- well done!!!
I think this looks really great. And by the way you can use a nail punch to get the nails in further with a hammer. The thing is made out of metal and lloks like a pencil of sorts. but it lets you get the nails flush with the board without using a nail gun.
I'm glad to see you tackled this project. We are planning on doing a board and batten technique in my daughter's room with wallpaper above. It looks great!
wow! that looks amazing! what a difference that made.
Get rid of one of the doors…especially if its not necessary, maybe to the laundry room it will open tha hall up.
Looking good already Cass! Can't wait to see what you come up with next!
Fantastic! I think board and batten makes a room feel even more finished. Can't wait to see what else you have planned for this room!
I'm curious to see how this ends up as your landing zone!
I love the look! It really does help to disguise the doors. Can't wait to see the rest!
Love this makeover! The b&b and white paint really makes the space cohesive.
Looks great, and definitely "hides" all the doors!
Looks fantastic! I love the idea and I even have my own little room that would be perfect in. Thank you so much!
Totally love how this came out. And totally with you on feeling like it's been done and done and done…and yet it still looks great and is so cheap you can't beat it! I'm planning to do it in my home office soon.
Already such a transformation!
Looks gorgeous, Cassie! I am so impressed any time someone attempts this (and does such a beautiful job!). I am hoping that when the day comes that my husband and I move into our own home (instead of renting), I have the courage to use a hammer, wood, and nails! 😉
Looks great! Can't wait to see how the rest of the space comes together!
Looks awesome girl! Can't wait to see what's next!
Love it, of course!! I get asked about B&B on textured walls all the time so this will be the post I refer too!
This looks amazing! Such a great idea for that hallway. Can't wait to see what else you have up your those little cardi sleeves of yours.
Woohoo! Way to go!
I love board and batten and have been wanting it do it in my daughter's future big girl room (and then again in her current room for a future nursery). I think it's great when it's up at a high level, like you did in your mud room. I can't wait to see it when it's all done. But I do agree that hearing that term is a little old, even if I do like it.
LOVE! We are doing this treatment in my teens room this weekend! It was so helpful to show my hub your photos so he really gets it ( he thinks it looks like wood panels!!) 🙂
I've so enjoyed your blog and can't believe I haven't commented before now. It may have something to do with 4 kids and FT job. I am no professional woodworker, but I just so happened to have the pleasure of building a play/train table with my dad this last weekend (kids Christmas present). I learned that to make nails "flush" you can use a nail punch. They're pretty cheap and would be another option to a nail gun. Can't wait to see your final results.
Oooh girl, I like! Can't wait to see the final result.
you can use a nail set to make the nails go in if you do not have a nail gun.ang
Just found you via Pinterest (I think your Christmas mantel), loving it!!!
I'm so inspired to reorganize my garage and do THIS to my hallway! While only have 4 doors (7 is ca ca crazy!), I've been wanting this look!
We're in Texas too so have that crazy wall texture too. It never occurred to me to leave it and paint it white!!! LOVE it! Thx for the inspiration!!